2015/08/20

Shift gears with jBPM executor

Since version 6.0 jBPM comes with component called jBPM executor that is responsible for carrying on with background (asynchronous) tasks. It started to be more and more used with release of 6.2 by users and even more with coming 6.3 where number of enhancements are based on that component:

  • async continuation 
  • async throw signals
  • async start process instance
jBPM executor uses by default a polling mechanism with backend data base that stores jobs to be executed. There are couple of reasons to use that mechanism:
  • supported on any runtime environment (application server, servlet container, standalone)
  • allows to decouple requesting the job from executing the job
  • allows configurable retry mechanism of failed jobs
  • provides search API to look through available jobs
  • allows to schedule jobs instead of being executed immediately 
Following is a diagram illustrating a sequence of events that describe default (polling based) mechanism of jBPM executor (credits for creating this diagram go to Chris Shumaker)
Executor runs in sort of event loop manner - there is one or more threads that constantly (on defined intervals) poll the data base to see if there are any jobs to be executed. If so picks it and delegates for execution. The delegation differs between runtime environments:
  • environment that supports EJB - it will delegate to ejb asynchronous method for execution
  • environment that does not support EJB will execute the job in the same thread that polls db
This in turn drives the configuration options that look pretty much like this:
  • in EJB environment usually single thread is enough as it is used only for triggering the poll and not actually doing the poll, so number of threads should be kept to minimum and the interval should be used to fine tune the speed of processing of async jobs
  • on non EJB environment number of threads should be increased to improve processing power as each thread will be actually doing the work
In both cases users must take into account the actual needs for execution as the more threads/more frequent polls will cause higher load on underlying data base (regardless if there are jobs to execute or not). So keep that in mind when fine tuning the executor settings.

So while this fits certain set of use cases it does not scale well for systems that require high throughput in distributed environment. Huge number of jobs to be executed as soon as possible requires more robust solution to actually cope with the load in reasonable time and with not too heavy load on underlaying data base. 
This came us to enhancement that allows much faster (and immediate compared to polling) execution, and yet still provide same capabilities as the polling:
  • jobs are searchable 
  • jobs can be retried
  • jobs can be scheduled
The solution chosen for this is based on JMS destination that will receive triggers to perform the operations. That eliminates to poll for available jobs as the JMS provider will invoke the executor to process the job. Even better thing is that the JMS message carries only the job request id so the executor will fetch the job from db by id - the most efficient retrieval method instead of running query by date.
JMS allows clustering support and fine tuning of JMS receiver sessions to improve concurrency. All in standard JEE way. 
Executor discovers JMS support and if available will use it (all supported application servers) or fall back to default polling mechanism.

NOTE: JMS is only supported for immediate job requests and not the scheduled one

Polling mechanism is still there as it's responsibility is still significant:
  • deals with retries
  • deals with scheduled jobs
Although need for the high throughput on polling is removed. That means that users when using JMS should consider to change the interval of polls to higher number like every minute instead of every 3 seconds. That will reduce the load on db but still provide very performant execution environment.

Next article will illustrate the performance improvements when using the JMS based executor compared with default polling based. Stay tuned and comments as usually are more than welcome.


2015/05/27

jBPM talk at JBCNConf- polyglot and reactive jBPM

With recent trend to move to lightweight, container-less runtime environments, jBPM to prove it does not stand out from this approach came up with integration with Vert.x (2.x). This integration is to show users how to move towards reactive, event driven application without a need to run on any container but still use BPM capabilities.

So if you're interested how this looks like join as at JBCNConf - Barcelona, 26 - 27 June / 2015.

Together with Mauricio "Salaboy" Salatino we are going to introduce you to "Polyglot and reactive jBPM". This talk is intended for developers to give basic information about both jBPM and Vert.x and how they work together.
As part of the talk (actually bigger part of the talk) we will perform live demo that will illustrate:

  • jBPM as vert.x module
  • running jBPM projects (aka kjars) inside vert.x instance - one kjar one instance
  • use of clustered vert.x event bus to exchange information between jBPM projects on runtime
  • integration with KIE workbench to prove you can combine these two without affecting each other
  • use of different languages (Java, JavaScript, Groovy, Scala, Ceylon)  to interact with jBPM running on vert.x
So come and join us to see jBPM and Vert.x in action!

2015/04/24

Asynchronous continuation in jBPM 6.3

It's been a while since release of 6.2.0.Final but jBPM is not staying idle, quite the opposite lots of changes are coming in. To give a quick heads up on a feature that has been requested many times - asynchronous continuation.

So what is that? Asynchronous continuation is all about allowing process designers to decide what activities should be executed asynchronously without any additional work required. Some might have already be familiar with async work item handlers that require commands to be given that will be carrying the actual work. While this is very powerful feature it requires additional coding - wrapping business logic in a command. Another drawback is flexibility - one could not easily change if work shall be executed synchronously on asynchronously.

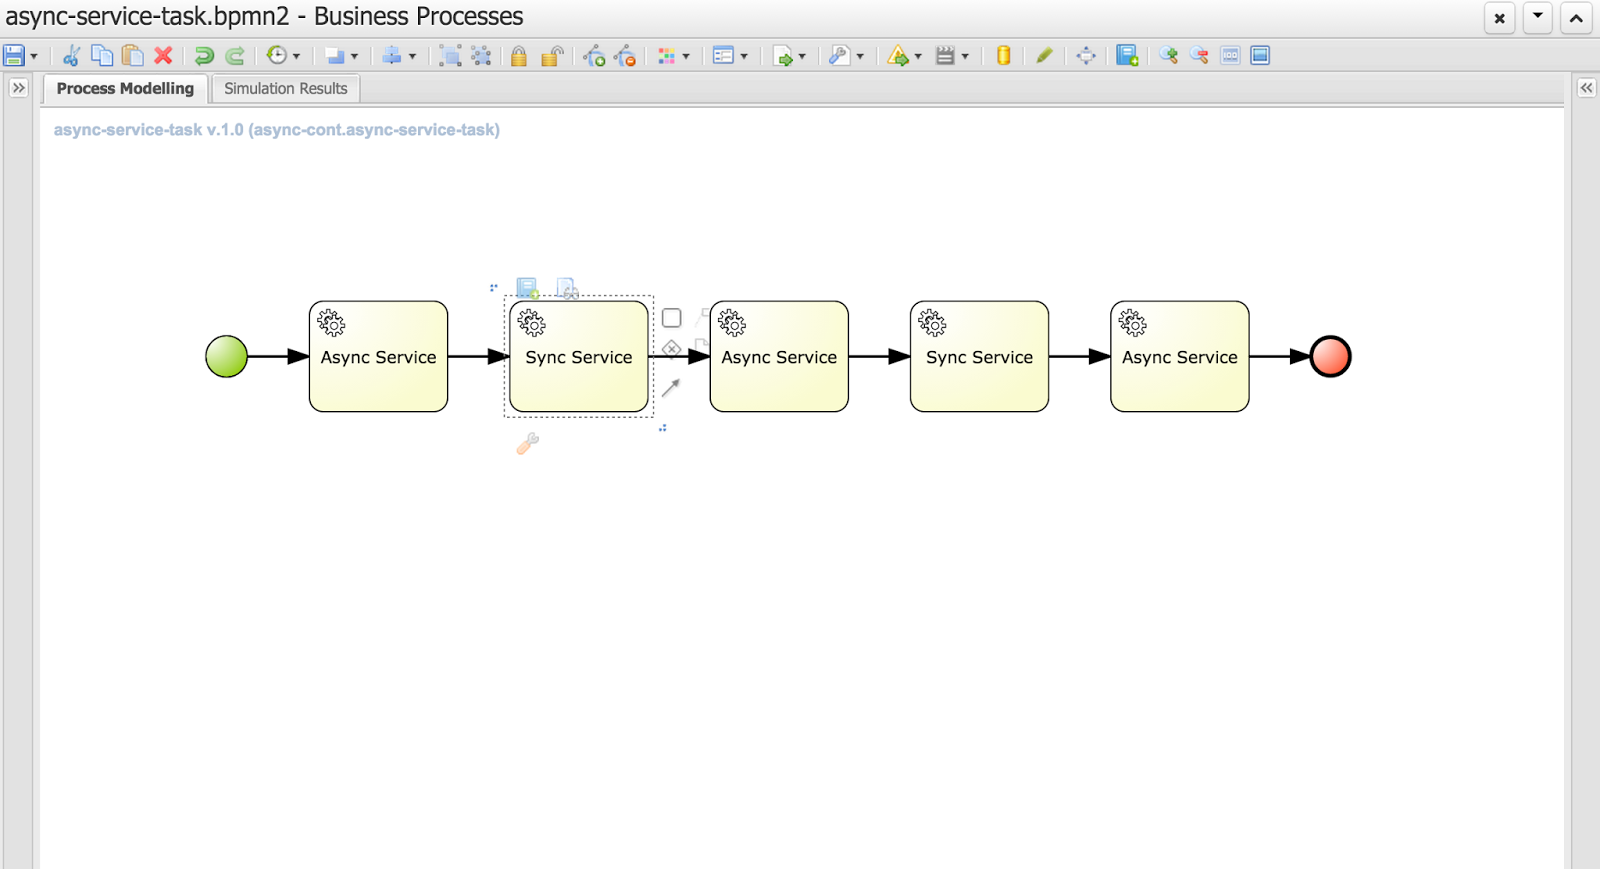
Nevertheless let's take a look at the evolution of that concept to allow users decide themselves what and when should be executed in the background. Let's take a quick look at simple process that is composed of service tasks

You can notice that this process has two types of tasks (look at their names):

  • Async service
  • Sync service
As you can imagine async service will be executed in background while Sync service will be executed on the same thread that its preceding node - so if the preceding node is async node sync node with directly follow it within same thread. 

That's all clear and simple but then how do users define if the service task is async or sync? That's again simple - it's enough to define a dataInput on a task named 'async'
That is the key information to the engine with will inform it how to deal with given node.
Above is the configuration of an Async Service with defined 'async' data input. Next image shows the same configuration but for Sync Service
There is no 'async' dataInput defined.

Here is where I would like to ask for feedback if that way of defining async behavior of a node is sufficient? There is no general BPMN2 property for that behavior and extending BPMN2 xml with custom tags/attributes is not too good in my opinion. 
We could simplify that on editor level where user could simply use checkbox which would define dataInput for the user. All comments are welcome :)

So what will happen if we run this process?


// first async service followed directly by sync service (same thread id)
16:42:26,973 INFO (EJB default - 7) EJB default - 7 Service invoked with name john
16:42:26,977 INFO (EJB default - 7) EJB default - 7 Service invoked with name john

// first async service followed directly by sync service (same thread id)
16:42:29,958 INFO (EJB default - 9) EJB default - 9 Service invoked with name john
16:42:29,962 INFO (EJB default - 9) EJB default - 9 Service invoked with name john

// last async service
16:42:32,954 INFO (EJB default - 1) EJB default - 1 Service invoked with name john


If you look at the timestamps you will see that they match the default settings of jBPM executor - one async thread running every 3 seconds. These are of course configurable so you can fine tune it according to your requirements.

Each process instance of this process will be divided into three steps
Even though Service Tasks are synchronous by nature in BPMN2 with just single setting we can make them execute in background without any coding. 

Moreover, those of you who are already familiar with how jBPM works internally might noticed that these blue boxes actually represents transaction boundaries as well (well, not entirely as start and end node are part of transaction too). So with this we explored another advantage of this feature - possibility to easily define transaction scopes - meaning what nodes should be executed in single transaction. I believe that is another very important feature requested by many jBPM users.

Last but not least bit of technical details. This feature is backed by jBPM executor which is the backbone of asynchronous processing in jBPM 6. That means you need to have executor configured and running to be able to take advantage of this feature. 
If you run on jBPM console (aka kie workbench) there is no need to do anything, you're already fully equipped to do async continuation for all your process.
When you use jBPM in embedded mode there will be some additional steps required that depends on how you utilize jBPM API.
  1. Direct use of KIE API (KieBase and KieSession) - here you need to configure ExecutorService and add it to kieSession environment under "ExecutorService" key. Once it's there it will process the nodes async way
  2. RuntimeManager API - similar to KIE API though you should add ExecutorService as one of environment entires when setting up RuntimeEnvironment
  3. jBPM services API - you need to add ExecutorService as attribute of DepoymentService, if you use CDI or EJB that will be injected automatically for you (assuming all dependencies are available to the container)
This feature is available for:
  • all task types (service, send, receive, business rule, script, user task)
  • subprocesses (embedded and reusable)
  • multi instance task and subprocess

But what happens if user mark node as async but there is no ExecutorService available? Process will still run but will report warning in the log and proceed with nodes as synchronous execution. So it's safe to model your process definition in async way even if there is no async behavior available (yet)

Eclipse use

For those using eclipse modeler instead of web designer: In the new BPMN2 editor (1.2.2), there is a new element under general tab for all tasks, called Metadata. All that needs to be done is add an entry named customAsync and value = true. This will mark the task as asynchronous.

Hope you will like this feature and don't hesitate to leave some comments with feedback and ideas! 

P.S.
This feature is currently on jBPM master and scheduled to go out with 6.3, so if you would like to try it take the latest nightly build or build jBPM from source.

More to come with jBPM so stay tuned...

2015/03/09

jBPM 6.2.0.Final released!

Last Friday (06.03.2015) jBPM 6.2.0.Final has been released.

It comes with large number of bug fixes and quite a list of new features, to name just few:

  • improved services layer that support various framework add ons
    • CDI
    • EJB
    • Spring
  • jbpm executor improvements and fixes to allow it to run time based reoccurring jobs and be executed in Spring environment
  • improved usability and stability of the KIE workbench application
  • Container support
    • JBoss EAP
    • Wildfly
    • Tomcat
    • WebSphere
    • Weblogic
  • and more that you can find here.
For bug fixes see change log (look at all versions that starts with 6.2.0...).

Let's get started with latest and greatest! ... in three steps


Step 1: Download

First you need to download it:

Step 2: Read and learn

Learn more about jBPM and it's various components by following latest version of documentation

Step 3: Try it

the best way to start is to follow jBPM installer chapter in documentation, but if you're already running jBPM 6.1 you can take a look at this article that provides you with some useful hints on installation and upgrade procedure.

Not only jBPM

At the same time Drools and Optaplanner 6.2.0.Final has been released as well. Checkout their web pages to learn more.

2015/03/06

jBPM 6.2 installation and upgrade from previous version

jBPM 6.2 is almost out the door so it's time to give a quick heads up on how to install and upgrade if you already have previous version of jBPM running.

Installation with jBPM installer

the easiest and best way to install jBPM is using jBPM installer that is described in jBPM documentation. It's simple and automated installation process that:
  • downloads all required components
  • configures services (data source, folder structure, etc)
  • bundles the application 
  • deploys all applications (jbpm console aka kie workbench and dash builder for BAM)
All is done with ant script so it can be modified in case additional requirements pops up. Most of the information users could be interested in is stored in build.properties file which defines
  • version numbers of components to download, 
  • container to be used
  • data base to be used
So if you're going to try jBPM for the first time, I would recommend to go with this approach.

Installation on Wildfly 8.1.0.Final application server

Another approach would be to configure parts of the application and application server manually on clean or already existing Wildfly server. Following are the steps required:
  1. Create data source for jbpm to use - if you want to use default in memory data base that comes with Wildfly server you can skip this step - data source is already defined
    1. Create JBoss module for your JDBC driver e.g. org/postgres
    2. Edit WILDFLY_HOME/standalone/configuration/standalone-full.xml
    3. Define data source for the driver you created e.g. postgres
    4. <xa-datasource jndi-name="java:jboss/datasources/jbpmDS" pool-name="postgresDS" enabled="true" use-java-context="true">
         <xa-datasource-property name="ServerName">
            localhost
         </xa-datasource-property>
         <xa-datasource-property name="PortNumber">
           5432
         </xa-datasource-property>
         <xa-datasource-property name="DatabaseName">
            jbpm
         </xa-datasource-property>
         <driver>postgres</driver>
         <security>
           <user-name>jbpm</user-name>
           <password>jbpm</password>
         </security>
      </xa-datasource>
      
  2. Add application users that will be given access to kie workbench
    1. Use WILDFLY_HOME/bin/add_user.sh script (or add_user.bat for windows) to add user(s)
      1. Use application realm
      2. make sure to assign users one or more of following roles: admin,analyst,user,developer,manager
      3. Additionally you can assign your user to any other roles that will be used for human task assignments e.g HR,PM,IT,Accounting for HR example process
      4. If you would like to use asset management feature that comes with 6.2 assign your user another role called: kiemgmt
  3. Download wildfly distribution of the kie workbench for version 6.2.0.Final from here.
  4. Extract the war file into WILDFLY_HOME/standalone/deployments/jbpm-console.war
    1. You should have all files from the war file inside jbpm-console.war
  5. Configure persistence for jbpm console
    1. Edit WILDFLY_HOME/standalone/deployments/jbpm-console.war/WEB-INF/classes/META-INF/persistence.xml file
    2. Change JNDI name for the data source
    3. Change the hibernate dialect for data base you use
  6. Create jbpm-console.war.dodeploy empty file inside WILDFLY_HOME/standalone/deployments directory
That's all, now you're ready to start your application server with jbpm console (kie workbench) deployed. To do that go into WILDFLY_HOME/bin and issue following command:
./standalone.sh --server-config=standalone-full.xml

or for windows
./standalone.bat --server-config=standalone-full.xml

NOTE: If you don't have internet access or you don't want to load example repositories from github add following parameter into the server startup command: -Dorg.kie.demo=false

./standalone.sh --server-config=standalone-full.xml -Dorg.kie.demo=false

or for windows
./standalone.bat --server-config=standalone-full.xml -Dorg.kie.demo=false

Upgrade jBPM from 6.1 to 6.2

Upgrading of already existing installation of jBPM console (kie-workbench) that runs with version 6.1 (though from 6.0.1 should be pretty much the same though I haven't tested myself) is quite simple, but requires some steps to be manually executed.

There are some data base changes that must be applied to successfully upgrade workbench to version 6.2 and do not loose any context - like missing deployments, nor not being able to see process or task instances. 

So let's upgrade existing 6.1 environment
  1. Shutdown your existing server(s) that run jBPM 6.1 - if there are any running instances
  2. Perform data base upgrade
    1. jBPM 6.2. comes with upgrade script for commonly used data bases, it can be found as part of jbpm installer/db/upgrade-scripts package or can be taken from gihub.
    2. This script contains all data bases so please take only section that applies to your data base (below sql script for postgesql data base as an example)
    3. ALTER TABLE sessioninfo ALTER COLUMN id TYPE bigint;
      ALTER TABLE AuditTaskImpl ALTER COLUMN processSessionId TYPE bigint;
      ALTER TABLE ContextMappingInfo ALTER COLUMN KSESSION_ID TYPE bigint;
      ALTER TABLE Task ALTER COLUMN processSessionId TYPE bigint;
      
      create table DeploymentStore (
          id int8 not null,
          attributes varchar(255),
          DEPLOYMENT_ID varchar(255),
          deploymentUnit text,
          state int4,
          updateDate timestamp,
          primary key (id)
      );
      
      alter table DeploymentStore add constraint UK_DeploymentStore_1 unique (DEPLOYMENT_ID);
      create sequence DEPLOY_STORE_ID_SEQ;
      
      ALTER TABLE ProcessInstanceLog ADD COLUMN processInstanceDescription varchar(255);
      ALTER TABLE RequestInfo ADD COLUMN owner varchar(255);
      ALTER TABLE Task ADD COLUMN description varchar(255);
      ALTER TABLE Task ADD COLUMN name varchar(255);
      ALTER TABLE Task ADD COLUMN subject varchar(255);
      
      -- update all tasks with its name, subject and description
      update task t set name = (select shorttext from I18NText where task_names_id = t.id);
      update task t set subject = (select shorttext from I18NText where task_subjects_id = t.id);
      update task t set description = (select shorttext from I18NText where task_descriptions_id = t.id);
      
      INSERT INTO AuditTaskImpl (activationTime, actualOwner, createdBy, createdOn, deploymentId, description, dueDate, name, parentId, priority, processId, processInstanceId, processSessionId, status, taskId)
      SELECT activationTime, actualOwner_id, createdBy_id, createdOn, deploymentId, description, expirationTime, name, parentId, priority,processId, processInstanceId, processSessionId, status, id 
      FROM Task;
      
    4. Execute these scripts on your data base - NOTE: make sure that you execute these scripts as schema owner to avoid any permission violation issues one startup
  3. Remove jbpm console war file from your application server deployments folder WILDFLY_HOME/standalone/deployments
  4. Download wildfly distribution of the kie workbench for version 6.2.0.Final from here.
  5. Extract the war file into WILDFLY_HOME/standalone/deployments/jbpm-console.war
    1. You should have all files from the war file inside jbpm-console.war
  6. Configure persistence for jbpm console
    1. Edit WILDFLY_HOME/standalone/deployments/jbpm-console.war/WEB-INF/classes/META-INF/persistence.xmfile
    2. Change JNDI name for the data source
    3. Change the hibernate dialect for data base you use
  7. Create jbpm-console.war.dodeploy empty file inside WILDFLY_HOME/standalone/deployments directory - if not already there
That's pretty much all steps that are needed, but before you start the server let me provide you with some changes that are worth noting for 6.2 version that might impact the way it was used.
  • in 6.1 all deployment units that were active on the server were stored in system.git repository - which made it workbench specific and quite hidden - 6.2 comes with db based store for information about active deployments. With that, by default storage of deployment unit info are no more persisted into system.git. Though it can be enabled to be still stored in there by using system property: -Dorg.kie.git.deployments.enabled=true
  • in 6.1 all operations of Build & Deploy issued from Project Editor caused auto deploy to runtime which was not always desired, this can be disabled using system property: -Dorg.kie.auto.deploy.enabled=false
  • in 6.1 redeploy of same version (regardless if that was concrete version or snapshot) was by default allowed, in 6.2 concrete versions must be explicitly undeployed before they can be redeployed. This can be overridden by system property which will allow redeploy for all versions: -Dorg.kie.override.deploy.enabled=true
Now you can start your server and enjoy enhancements and bug fixes that jBPM 6.2 brings in.
 To do that go into WILDFLY_HOME/bin and issue following command:
./standalone.sh --server-config=standalone-full.xml

or for windows
./standalone.bat --server-config=standalone-full.xml

Hope it will be useful and as usually comments are more than welcome.

2015/01/23

MultiInstance Characteristic example - Reward Process

One of a great features of BPMN (and not only) is the multi instance activity aka for each. To put it simple same activity is repeated for each item from input collection. That is usually good fit for distributing work across number of people to gather their input or opinion.
jBPM provides support for it since version 5 but it was enhanced with every version. Current support covers:

  • subprocess and individual task
  • input and output as collection
  • completion condition on entire multi instance activity (subprocess or task)

Equipped with that we can build powerful processes with simplified structure. Even more than that: it's all dynamic meaning number of instances can (and actually should as best practice) reference process variables for both input and output.

To show it in practice we go over an example that is based on Eric Shabell's Reward demo. It has been only slightly modified to focus mainly on the multi instance support jBPM comes with in version 6.2 community. 

So what we have in this process?
  1. When process start it will ask for some details about the person who shall receive award and its details
  2. Once instance is started it will go into 'Associate Reviews' user task where associate needs to provide following information:
    1. how many peer reviews should be performed
    2. how many of them are required to move on without waiting for all to be completed
  3. Once this information is available 'Setup Reviews' task will prepare all required structures and populate process variables that will feed multi instance subprocess
  4. 'Evaluate Award' task will be created multiple times based on (2.1) selection
  5. Each instance of that user task will ask for approval and result of it will be kept in multi instance output collection
  6. It has a completion condition that will evaluate result every time one instance of 'Evaluate Award' task is completed as soon as it becomes true it will move on and cancel remaining task instances of 'Evaluate Award'
  7. 'Calculate results' will be performed to check what output is collected - if award is approved or rejected and based on that will go to one of the paths.
So let's review process configuration in details, starting with process variables


This in general is nothing special, just worth noting two variables:
  • reviews_collection
  • reviews_results
both are of type java.util.ArrayList (they can be of any collection type) and they will be used for configuring multi instance subprocess. Important to note is that both must be non null before they can be used in multi instance activity.

Next let's review how the multi instance activity is configured:

MI collection input - this is the collection which will be used to create individual instances of given activity. In other words, each element from that collection will be assigned to separate activity instance.
MI collection output - this is the collection which will collect results of execution of multi instance activity - will aggregate all results produced. This is optional as not every multi instance activity must produce result that shall be collected.
MI completion condition - expression (currently MVEL) that will be evaluated at every completion of activity instance and as soon as it becomes true it will leave multi instance activity even if not all instances are completed. Those not completed will be canceled.
MI data input - this is the variable name that will be given to individual activity instances produced by multi instance activity. 
MI data output - this is the variable name where the output of individual activity instance will be stored. It's optional as not all activities must produce results


Last but not least let's take a look in details at the completion condition as it provide quite powerful way of controlling multi instance activity completion.

In case it won't be readable (or for copy paste reason) here is the expression:

($ in reviews_results if $ == true).size() == approvalsRequired;

so what does it say? In general it evaluates all items in the 'reviews_results' collection and counts all elements that has value set to 'true'. Next it compares its size with the 'approvalsRequired' process variable to check if already collected approvals is enough.

For those interested, this is MVEL projections example which gives very powerful option to operate on collections.

That would be all to this article. For complete runnable example visit github. You can directly clone it from your kie-workbench installation (aka jbpm console) and run it there. It comes with all required parts:
  • process
  • forms
  • data model
All configured and ready to be executed (just make sure you run on jBPM 6.2 or higher). Enjoy

As usual comments and feedback most welcome.

2015/01/07

jBPM talk and workshop at DevConf 2015

I am happy to announce that a talk and workshop about jBPM 6 has been accepted at DevConf 2015 in Brno.

Talk: jBPM - BPM Swiss knife

During the presentation jBPM will be introduced from the Process Engine & framework perspective.The main goal of the session is to share with the community of developers how they can improve their systems implementations and integrations by using a high level, business oriented methodology that will help to improve the performance of the company. jBPM will help to keep the infrastructural code organized and decoupled from the business knowledge. During the presentation the new APIs and new modules in jBPM version 6 will be introduced for the audience to have a clear spectrum of the tools provided.

Speaker: Maciej Swiderski

Workshop: Get your hands dirty with jBPM 

This is continuation of the presentation of jBPM (jBPM - BPM swiss knife) that introduces to jBPM while this is mainly focused on making use of that knowledge in real cases. On this workshop users will be able to see in action jBPM from both perspectives:
  • as a services when jBPM is used as BPM platform
  • as embedded when jBPM is used as a framework in custom applications
This workshop is intended to give a quick start with jBPM and help users to decide which approach is most suitable for their needs.

Speakers:
Jiri Svitak
Maciej Swiderski
Radovan Synek

Schedule for the complete conference can be found here. See you there!!!