Showing posts with label automatiko. Show all posts

2022/07/03

An alternative look at workflows in cloud era

Workflows have been around software development for many decades. With its peak popularity around the SOA (service oriented architecture) times. Although it was always positioned as something on top, something superior. In fact, it led to smaller adoption as it became quite complex to build solutions on centralized workflow platforms. 

Currently workflows are starting to be more and more popular again, though their main use case is around service orchestration. In my opinion, this is the biggest misconception around workflows - they are actually way more than just service orchestration. 

What are workflows good at then?

Workflows serve very well in following use cases

  • business entity life cycle - a common use case in various enterprises or domains is to build systems that are responsible for an end to end life cycle of the business entity, e.g. parts in the automotive industry. Parts have well defined life cycle that goes through number of phases

  • event streams - execute business logic on top of the event stream. More and more common are IoT based use cases where workflows can run very close to the sensors without the need to push data to some cloud offerings for processing

  • batch processing - workflows are perfect fit for defining batch processors that are usually triggered by time events (run every night at 10pm) or by incoming message

  • human centric systems - workflows come with out of the box features that allow to model and implement advanced interactions with human actors such as reassignment, notifications, escalations and more

  • Kubernetes operators - operator pattern in Kubernetes is an excellent example where workflows have a natural place, operator logic is a constantly repeating the set of steps to reach the desired state of the resource, workflows can easily define the steps and then repeat consistently for each resource deployed to Kubernetes cluster

The other aspect of a bit misleading approach to workflows is that they are usually outside of the service or system. While this makes sense for service orchestration use cases, it does not bring much value when it comes to above mentioned scenarios. Instead, workflows could play an essential role in the service or system being built. Let’s explore what this could look like and how it corresponds to the cloud.

With that, let’s introduce three new concepts around workflows

  • workflow as a service

  • workflow as a function

  • workflow as a function flow

Workflow as a service

Workflow as a service aims at using workflows to be the base for creating service on top of it. This means that developers use workflows as a sort of programming language, yet another one in their tool box to avoid the need of developing the boilerplate code. Let’s break this down a little bit 
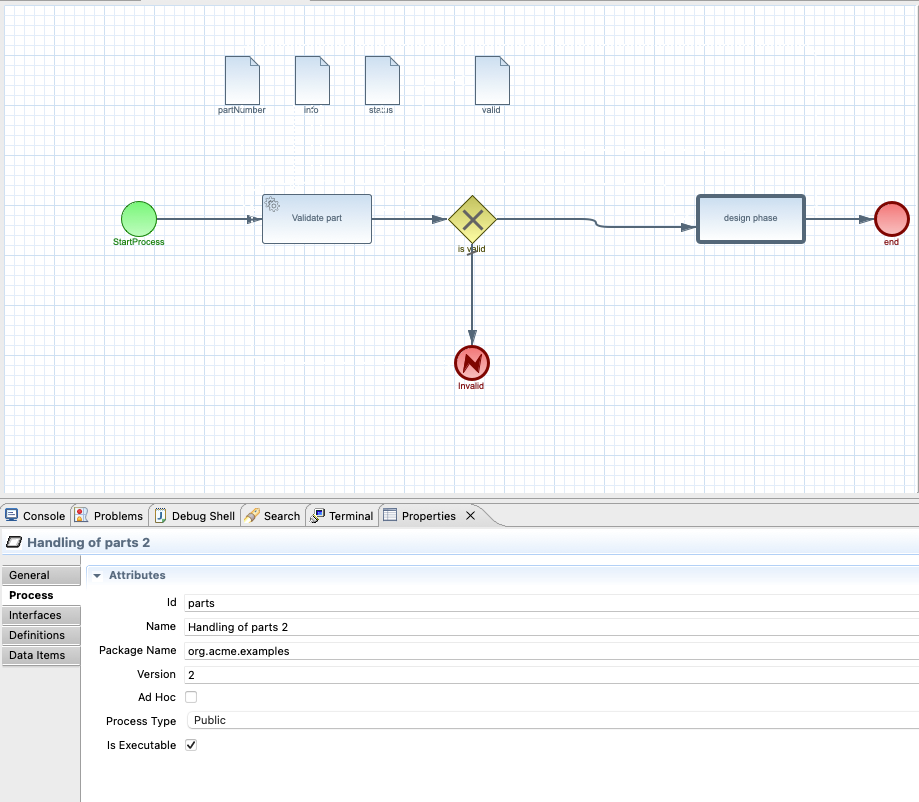

In the above workflow definition we can find few important aspects

  • set of activities that tells what will actually happen

  • data model (partNumber, info, status and valid) that represents a complete set of information associated with given resource

  • metadata of the workflow like id, name, version, etc

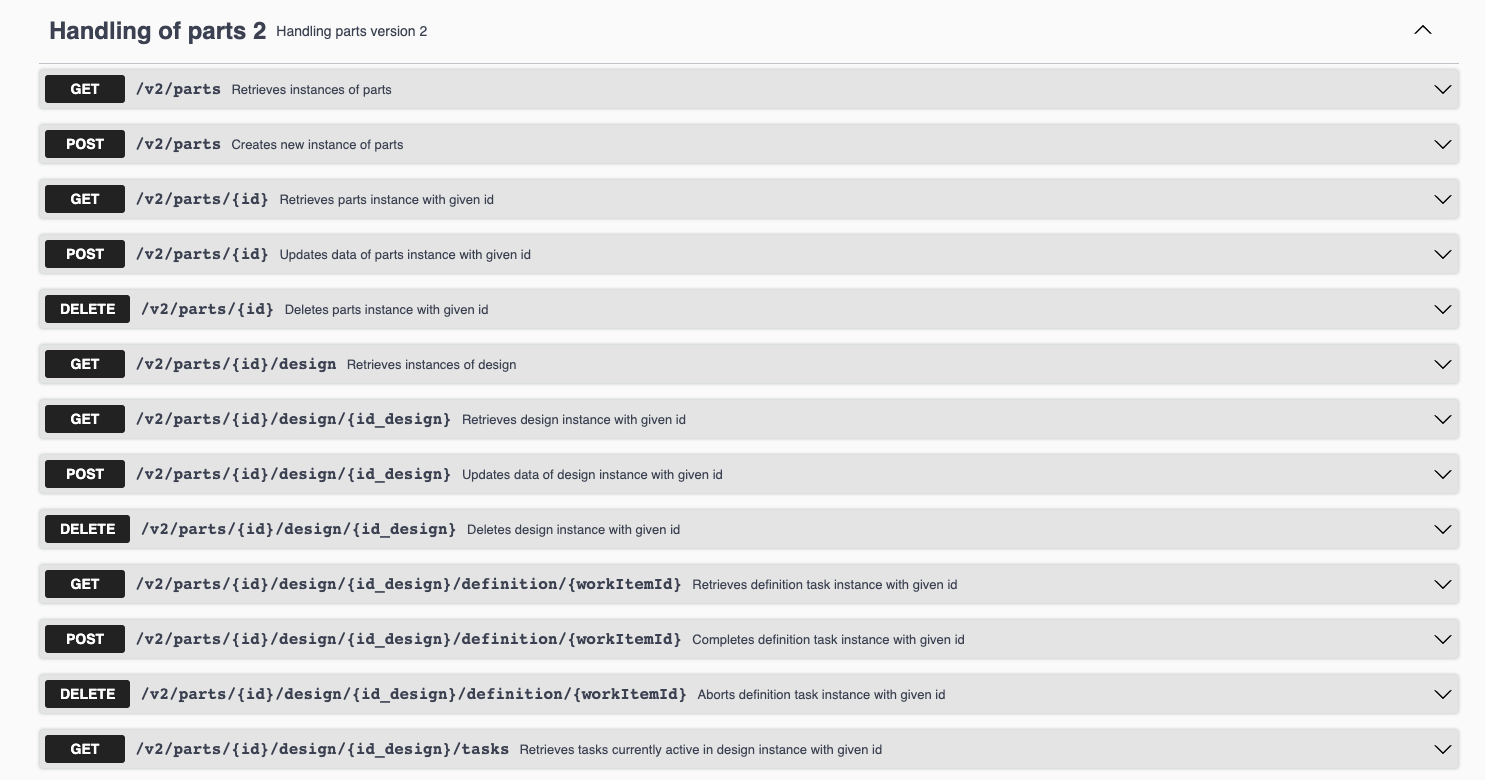
All of that is considered source information to build up a service from it. Essentially, workflow definition represents CRUD (create, read, update, delete) service interface. The data model represents the resource behind the service interface - it’s the entity that the CRUD operations are managing. Set of activities extends the CRUD service interface with additional capabilities to allow consumers of the service a richer interaction model. 

Workflow as a service concept aims at using workflow definition as input and transforming it to a fully functional service interface with complete business logic implementation instead of just having a set of stubs generated.  Main idea behind it is to allow developers to focus on what is important - the business logic that is specific to the domain they work in rather than developing things that can be easily derived from the business model - CRUD service interface.

Workflow as a function

Workflow as a function aims at taking more advantage of the various cloud offerings to offload developers from taking care of infrastructure. Cloud functions become quite popular where the most famous is AWS Lambda, but certainly it is not the only one. Other ones that are popular are Azure Functions and Google Cloud Functions but there are others that are starting to pop out as well. 

Workflows can be used to model a business logic that will be then deployed as a function to one of the cloud offerings. What is important is that the workflow acts like an abstraction layer that again allows one to focus on the business needs rather than the plumbing code to know what it takes to run it as AWS Lambda or Azure Function.
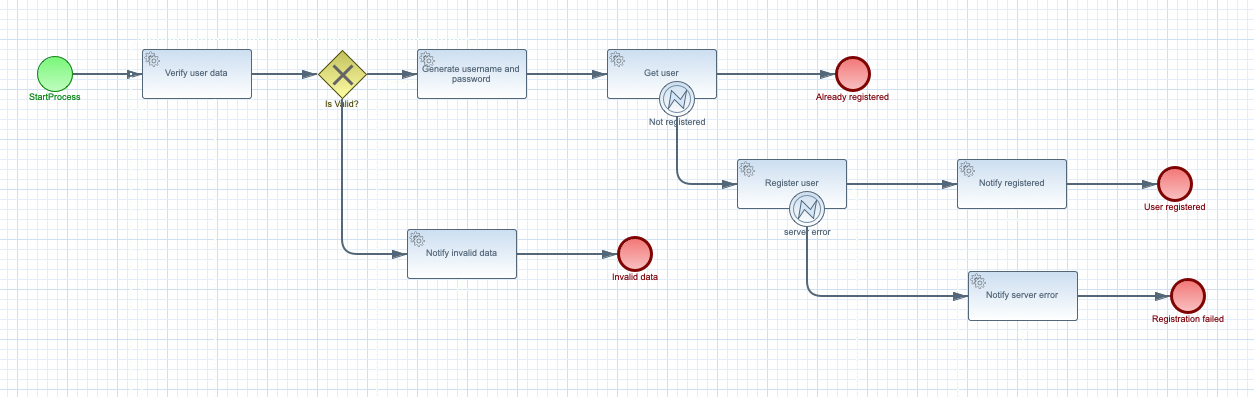


Above workflow, that is a user registration use case, clearly defines what is the business logic behind it and it is specific to a given domain. Workflow as a function means that it will be considered as a function, with well defined input and output. Deployment to the cloud function environment becomes the secondary aspect that is taken care of automatically.


Workflow as a function flow

Last but not least is the workflow as a function flow. It expands on the idea of workflow as a function where the main principle is to model business use case as complete as possible but break it down to number of functions that are 

  • self contained - represent given piece of business logic

  • independent - are not aware of any other function

  • invokable at any time - can be triggered at any point in time regardless of the other functions

  • scalable - functions can be easily scaled to accommodate the traffic needs
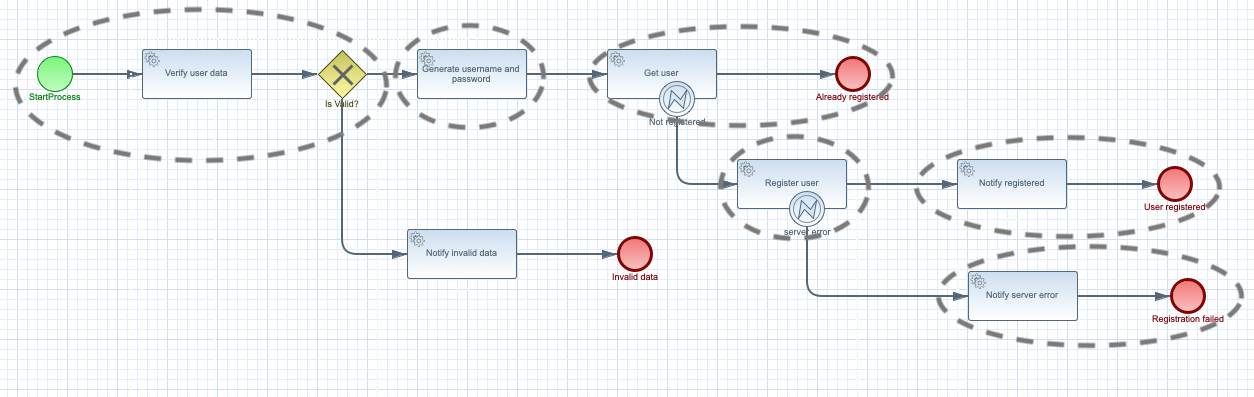

Business logic is then represented at runtime as individual functions that are triggered by events. Each function has input (an event) and can produce zero or many outputs (events). In turn, produced events can trigger other functions. What is important to mention is that functions do not trigger (or call) other functions explicitly, they simply produce events that other functions can consume.

This approach opens the doors for greater scalability as events can be efficiently distributed across many replicas of the functions.

Regardless of the concept used, workflows come with many features that make them useful to build core business logic. Something that is usually overlooked is the isolation characteristic that workflows bring by design. Workflows are built as a definition, sort of a blueprint and then this blueprint is instantiated to represent individual instances. Each instance exists in complete isolation, including its data, state, etc. Other features that are important are:

  • reliable persistence, 
  • distributed timer/job scheduling and execution, 
  • messaging integration and many more.

Enough theory, can this actually run?

Being introduced to the concepts, an obvious question is - can it actually run? Is there anything that implements those concepts? 

The short answer is YES!

This leads us to an open source framework called Automatiko that aims at building services and functions based on workflows. It implements all three concepts in a unique way. Let’s explore a little bit about the framework itself.

Automatiko is built with Java, it’s fully open source under Apache 2 license and can be freely used for any type of use cases. It is built on top of Quarkus, a cloud native Java toolkit for building services of any kind. Automatiko seamlessly integrates with Quarkus to allow developers to be effective and to have the best developer experience.

So how does Automatiko deliver workflow as a service, function and function flow?

First and foremost, it follow Quarkus philosophy to perform as many things at build time. So it does all the heavy lifting at build time. The main parts of this hard work is to transform the workflows into service, function or function flow. Let’s dive into each of the concepts' implementation to understand it better.

Workflow as a service in Automatiko 

Automatiko at build time will look at workflow definitions and transform them to service interface - REST service interface with a complete definition based on OpenAPI. It can also create a GraphQL service interface that will open up for more advanced use cases to take advantage of applying principles of under and over fetching that GraphQL comes with. 

As mentioned before, it integrates with Quarkus and allows users to use any feature of Quarkus to pair it with the need of workflows. Taking it even further Automatiko discovers what is available and binds to it without much of a hassle. An example of it is integration with data stores or messaging brokers that can be easily used from workflows.

A complete and ready to run example


Workflow as a function in Automatiko

To implement workflow as a function, Automatiko relies on Funqy, a Quarkus approach to building portable java functions. Similar to how it is done for workflow as a service, Automatiko at build time examines workflows and creates functions from them. As the aim for workflow as function is to be completely agnostic from the deployment platform, there is no need to change any line of code to make the function runnable on AWS Lambda, Azure Functions or Google Cloud Functions. It only requires project configuration (like dependencies) which Automatiko provides as configuration profiles.

A complete and ready to run example


Workflow as a function flow in Automatiko

Lastly, workflow as a function flow in Automatiko is also based on Funqy, but this time it leverages Knative project to build function chaining based on events (Cloud Events). Knative is a kubernetes based platform to deploy and manage modern serverless workloads. In particular, Knative eventing comes with universal subscription, delivery and management of events that allows to build modern applications by attaching business logic on top of the data stream - the events.

Again, at build time Automatiko breaks down the workflows into a set of functions and creates all the Knative manifest files required to deploy it. It comes with a trigger setup that binds all the pieces together (Knative eventing and the functions) so developers can easily move this from development to production.
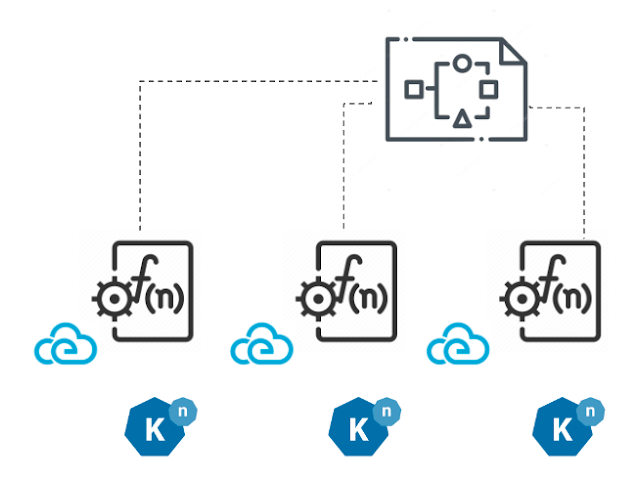

Note that Knative is a container based serverless platform. With that, Automatiko follows this approach and packages all functions into a single container image that can be scaled without problems. Knowing the characteristic of the functions - self-contained and invokable at any time, this container can be scaled to any number of replicas to provide maximum throughput as each replica has same runtime responsibility and can take execution based on incoming events.

A complete and ready to run example

A more complete article on workflow as a function flow is also available in Knative blog.

Wrapping up

This article was intended to put a slightly different light at workflows, especially in relation to the cloud. Main takeaway is to give readers a bit of food for thought that workflows are much more than service orchestration and that using them as part of the core business logic has a lot to offer. Concepts introduced and the implementation of them should be a good proof that workflows used to represent business logic is not just possible but as well efficient from development and maintenance stand point.

2022/06/01

Serverless Workflow vs BPMN - comparison


Workflows are becoming (again) more popular and pretty much all cloud providers have something to offer in that area. This article is not to cover all possible workflows but two in particular I have worked with

  • Serverless Workflow
  • BPMN - Business Process Model and Notation

Serverless Workflow

Serverless workflow is a standards-based DSL (workflow definition language) and open-source developer tools and runtimes. What is worth to mention it is a vendor neutral workflow language that aims at providing portable workflow definition language and tools including runtimes.

BPMN

BPMN is both graphical notation (it actually originated from it) and interchange format (xml based) to describe workflows or to put it more in context of BPMN a business process. It serves as documentation of the business logic but also is often used to execute these processes as part of automation platforms.

So at first sight you can already notice first difference - one is positioned from technology perspective - serverless while the other is more business oriented. The other important difference is the target audience. Serverless Workflow definition uses DSL that can be either JSON or YAML which makes it a better fit for technical users. BPMN has started from being a documentation tool to be able to graphically model business logic and it then it was equipped with execution aspects.

So then which one is for what and for whom? Find out by reading full article.

2022/03/09

Secure access to approval tasks with OAuth Proxy

 In previous article, Approval Tasks for Tekton has been introduced. Though that version lacked support for authentication to first of all secure the application and second to simplify usage for approvers - no need to manually enter user id or email to verify they are eligible to work on given approval task.

This article will explain on high level what to do to secure Automatiko Approval Tasks for Tekton by using OAuth Proxy as a side car container. 

Read on at automatiko blog

2022/02/16

Approvals - "the missing" part of Tekton

Tekton is a fantastic project that allows to build pipelines for your CI/CD needs. It works really great as it takes advantage of dynamic nature of Kubernetes cluster and uses resources only when it actually executes a task.

Tasks that are executed can be pretty much anything that starts a container (pod) and executes. There is a huge collection of tasks available in Tekton Hub that can be easily used within your own pipelines. Have a further read about Tekton if you're not familiar with it here.

There is just one tiny issue - tasks in Tetkon are mainly about executing things and not waiting for things. And here comes Automatiko that plugs into the Tekton ecosystem via Custom Tasks. Custom tasks (realized in Tekton as Runs) allow to provide additional capabilities that are not meant to execute things - like starting a container/pod. Read complete article at automatiko blog

2021/12/22

Workflows with JMS messaging

 Last several years there is a lot of buzz about Apache Kafka, Apache Pulsar and in general about event streams. But looking into lots of organizations they are in many case still relying on "old good traditional messaging". To give one example of that, IBM MQ is very popular within small, medium and big enterprises to realize messaging between systems.

While event streams are starting to play bigger role in integration, there are still big opportunities to build systems and services based on traditional messaging. In Java world, JMS is an excellent solution to that. Majority (if not all) Java frameworks for building services have support for JMS such as Spring, Quarkus, Jakarta EE application servers and many more.

Have a read of full article here.

2021/11/30

Apache Kafka event stream with workflows

Apache Kafka event streams consumed by workflows

An inspiration for this blog post is another blog post by Piotr Minkowski that perfectly introduced Kafka Streams with Quarkus. This triggered a thought - can workflows be used as an alternative to Kafka Streams to process multiple event streams (merge them and process various events streams with some correlation logic)?


A complete blog article can be found at Apache Kafka event stream with workflows
 

2021/04/29

User task forms and email notifications in Automatiko

 Automatiko 0.4.0 has just been released. I comes with quite some new features among them are 

  • user task forms that is provided by user task management addon
  • user task notifications that is provided by user task email addon
These two combined provide an excellent support for human actors participating in workflow automation. This article is about to provide some hints behind these two features of Automatiko, so let's dive into them directly.

User task forms

Forms that represent user task (a task assigned to human actors) are a common requirement in the process/workflow automation scenarios. In many cases it is expected that forms will be auto generated by the workflow engine (and some offerings on the market actually do that). But the main problem with that approach is that is is very limited. In many cases it can only support basic forms and what is even more important they are not providing proper business context behind the task. They are usually very generic and expose internal parts of the workflow engine that runs them. 

To give an example -  let's assume we have a simple vacation request approval task assigned to a manager. The auto generated forms are usually going to present it with a checkbox for approval decision and a button to complete the task. The reason for that is the generation of the task form is based on data types of its outputs which will be approved of type boolean and boolean is usually represented as check box. While this will work it does not show the form in expected format - meaning it would show the details of the request and then have two buttons one to approve and another to reject. Taking it even further if the reject button is used the form could ask for additional comment why it was rejected. This can't be done with auto generated forms.

The approach in Automatiko is bit different, it can still show very simple generic form but that is considered as fallback option as sometimes there is just a matter of providing kind of "For your information" type of tasks where the only thing to be done is to acknowledge it. Though for anything that requires input from end user the form should be designed and provided as part of the service.

This is realised with templates for user tasks. Each template is a fully featured HTML page that can use any kind of framework or styles. You can build a really dynamic forms with the use of JavaScript frameworks e.g. JQuery, you can style it with Bootstrap and so on. You own the entire space on how to build your forms, how to layout the forms, if you need to load data from other service to populate fields you can do that without a hassle.
Templates in Automatiko relies on Qute, a server side templating engine from Quarkus. It gives you all the power of the templating and is very well tuned for performance and fast delivery to your clients. Automatiko will give you all the details you need for given task so you can render it and make it very contextual to your users so they will directly know what is expected from them. Plus you can make it to look and feel as any other application in your organisation.

You can read up on the details on how to build your user tasks forms in Automatiko documentation and you can also take a look at vacation request example what makes use of it.

Email notifications

Another important aspect of the user tasks in workflow automation is to notify when a task is assigned. This is very common and almost any user of workflow automation expects this to be out of the box. Automatiko comes with this by a means of addon that will equip your service with this feature.


Emails are expected to serve as a way of notifying about task being assigned and not necessarily about the complete context behind the task. That's why a default template for emails in many cases will be good enough. But it is configurable as well so you can define an email notification template for every task separately. It uses the same approach as the user task forms - templates. 

In addition, tasks can be assigned to individuals and groups so somehow there must be a way to know the email addresses for them. By default Automatiko assumes users are represented as email addresses but that is not always the case. Don't worry, there is a simple way to solve it, by implementing a single interface you can provide your way of resolving user and group identifiers to email addresses. To learn more head to the Automatiko documentation.


At the end I'd like to give you an opportunity to see it in action, have a look at this short video showing both features in action.

If you have any questions or comments feel free to reach out on twitter or mailing list (@automatiko_io) automatiko-dev@googlegroups.com).

2021/04/14

Version workflow data with ease

 A common scenario when working with workflows is to handle data objects and their changes. In most of the situations workflow instance will only keep the last value of it and to realise use cases like comparing what was just sent to the instance with what was already in there requires having duplicated data object definitions. This is not the best approach as it makes the workflow definition "corrupted" with details less important from the business goal perspective.

With Automatiko (since version 0.3.0) there is an alternative way to this problem. This is to version data objects by annotating it with data object tag called versioned.

So what happens when you make data object versioned?

Automatiko engine will record every change to the variable as new version. These versions are then available to be accessed as any other variable but will require additional suffix to the variable name


  • suffix $ will give access to complete version list of the variable e.g. person$
  • suffix $X where X is a number of the version to retrieve it can be a negative (-1) to fetch latest version e.g. person$5 or person$-1

Sometimes referring to versions directly might result in errors like attempting to get the version that does not exist. To make it simpler, Automatiko provides ready to use functions that can be used from 

  • script tasks
  • gateway conditions

The functions you can use are as follows:
  • previousVersion(versions) allows to get latest version of the variable list - previousVersion(person$)
  • variableVersion(versions, number) allows to get variable version stored under version number - variableVersion(person$, 4) - note that this one is safe and will return null when given version number does not exist
  • isEqual(var1, var2) allows to easily compare two versions of the variable - isEqual(person, previousVersion(person$))


Another aspect is that you can easily create your custom functions by simply implementing io.automatiko.engine.api.Functions interface and implementing public static methods that will become functions and will be available in the workflow definition. You can read up more in Automatiko documentation.

In addition to that Process Management UI also provides quick access to variable versions and allows to also revert to given version of the data object. Once you have process management addon in your service it provides both UI and REST api to interact with versions of the data objects.


Following video shows this in action and the value it brings.


Stay tuned for more updates around Automatiko project. If you have any questions or comments join our community either on mailing list or GitHub discussions.

2021/03/17

Kubernetes Operator with Automatiko

Here is more of a developer view on the recently published article on Automatiko blog about building Kubernetes Operators with workflows. It shows that is brings significant value to the overall visibility of the operator logic and makes it really approachable for non kubernetes gurus.


I'd like to take it a bit further and show how efficient it can be thanks to the internals of Automatiko. Automatiko takes advantage of Quarkus that provide the runtime mechanics so to say. Quarkus comes with an outstanding feature called dev mode. Everyone who heard about Quarkus most likely heard about dev mode and live reload. But there is more to it!!!

Remote dev mode - is a sibling to the dev mode but it allows you to live reload application remotely. A perfect fit for in-container development or even better in kubernetes cluster development. This brings us to the unbelievable efficient developer experience when building Kubernetes operators - you can build them directly inside the Kubernetes cluster. No need for rebuilding the image, no need to redeploying the container and so on... it just works like a charm.


Have a look at this video illustrating how you can easily work on your operator logic that runs inside the kubernetes cluster. Make modifications to the logic and try it out almost instantly (assuming your kubernetes cluster and deployed container have enough resources to make it efficient ;)).


The video showed number of features

  • how to configure the application to run in remote dev mode
  • how to make changes to the workflow definition
  • how to make modification to application code
  • automatic reload of the application that includes both workflow and java classes
All working smoothly and efficiently without much of a hassle 

A huge kudos to Quarkus team for making it a fantastic piece of software that makes developer life easier... a truly cloud native as it enables direct in cluster development that speeds the work up significantly!!!

2021/02/25

Getting Started with Automatiko - IoT and MQTT - Part 2

As a follow up of part 1 of the Automatiko IoT and MQTT I'd like to take you further in exploration around workflows and IoT with MQTT. 


This time we look at the details of how to take advantage of some MQTT features (e.g. wildcard topics), collect sensor data into a bucket (or to make this simple - a list) and then assign user tasks based on amount of data collected instead of for every event.

In addition to that, we look into Automatiko features that makes using workflows for IoT way easier...

Wildcard topics

Let's start with MQTT feature for subscribers - this is actually what workflow in our sample is - a MQTT topic subscriber. So let's first look like how does it work under the hood in Automatiko.

Automatiko uses message events (start or intermediate) of BPMN to integrate with message broker - in this case MQTT. Message events are referencing message which describes the way how it can connect to the broker

  • by default uses name as the topic name 
  • data type of the message defines what type will be used to unmarshall incoming event into
  • supports custom attributes to alter defaults

In this article we are going to use custom attributes to define both topic that will use wildcard and the correlation expression to extract information out of the topic instead of the message (as we did in part 1).


In the screenshot above you can see two custom attributes
  • topic
  • correlationExpression
Topic is used to define the actual topic in MQTT that the workflow definition will be connected to and listening to incoming events. 

Correlation expression on the other side defines an expression that will be used for each incoming event to extract a key to be used for both identification and correlation.

Correlation expression uses special function "topic" that accepts following parameters
  • message - references the incoming message
  • index - an index that will reference different parts of the topic - it starts with 0
So for this example topic(message, 1) and the topic home/kitchen/temp the extracted correlation key will be kitchen. This in turn will be used as identifier of the workflow instance and thus you can use it in the service api calls.

You can read up more on the messaging support in automatiko in documentation.

Data bucket to collect sensor data

Next topic for today is the collection of sensor data. In part one we simply assign it to a data object of the same type. This time we expand and make sure we can accumulate the data.

So with that said there are few things that must be done

  • data object must be of type list
  • data object of type list needs to be initialized so it can easily get new items
  • message events received from MQTT need to be added to the list instead of assigned to data object (which would mean overridden)

Changing type is rather simple but ensuring it is initialized might be a bit more complex... but not with automatiko :) It is as simple as adding a tag on data object - auto-initialized


Configuring the message event to append to a list instead of assigning to the data object is also rather simple with automatiko, it is to use expression instead of direct mapping on the message event.


And that's it - we have now ready to use data bucket for our sensor data.


Decide when to include human actors

In this simple example we are going to receive events from MQTT and collect them into a bucket. But we don't want to involve human actors on each event. So here we can use gateways - a construct that allows us to have different paths in the workflow.


We only create a user task when the bucket has more than 5 events collected. Otherwise it simply end the path. But to prevent the workflow instance from finishing we make the workflow to be ad hoc - that allows it to stay active even though there are no active nodes in it. Marking workflow as ad hoc is done in the Properties -> Process panel.

See it in action

Have a look at this 10 min video showing all this in action. Note that this is live coding so you will see the errors as they might show up and you can imagine that this is not a scripted video where everything works from the start :)


Code can be found in github where each part of the series is a separate tag and main branch is pointing to latest version of the code base.

Conclusions

This part focused on bringing more advanced features of MQTT into the workflows to show the integration and how powerful these two can be. Using topic information as correlation, locating right workflow instances for incoming events and accumulating data is one of the most common use cases for IoT so workflows should make it simple to realize that.

2021/02/22

Getting Started with Automatiko - IoT and MQTT - Part 1

Around a month ago there was the first release of Automatiko project. It aims at providing an easy to use yet powerful toolkit to build services and functions based on workflows and decision. You can read up more information about the Automatiko project at the website or blog.

This blog post is very basic introduction that attempts to address the first level of entry when starting with Automatiko. 

Before you start...

So first things first... to get you up and running you need few things on your local computer

  • Java 11 +
  • Maven 3.6 +
  • Eclipse IDE  and Automatiko plugin
  • Optionally docker or podman to run services as containers

Head directly to documentation of Automatiko project to follow step by step instruction how to get the above up and running.

The use case

The use case of this introductory sample is very simple - to connect to MQTT to receive data from the sensors that are being published there. It mainly focuses on the steps to get this working and further articles will provide more advanced features in action.

Let's get started


To get started you need to create a project, a maven project to be precise. Luckily Automatiko comes with bunch of maven archetypes that makes this task way faster. One of the is `automatiko-iot-archetype` and this is the one we are going to use today.

Archetype can be used from IDE or command line so whatever you prefer can be used and result will be exactly the same.

Once the project is there, you need to define your data model that will be used by the workflow - as data objects. In this example you can create simple POJO like class names `Temperature` that will have two fields

  • value - of type double that will contain the temperature value from the sensor
  • room - the location where the temperature was measured

Next step is to create a workflow definition that will be responsible for connection to MQTT broker. This is realised by message start event that allows not only to be the entry point for new instances but also allows to define some characteristics of the connectivity and processing.


All that is needed to talk to the MQTT broker is defined directly in the workflow definition. In our sample case, the topic in MQTT broker is simple taken from the message defined on the start event.

At the same time, data that is received from the MQTT topic is automatically converted to the data model - represented as 'Temperature` class and mapped to a `temp` data object inside the workflow instance.

Lastly, user task is also added to the workflow definition that introduces a human actor into the flow. That is mainly for demonstration purpose to show we receive data from MQTT that is properly converted into a Temperature class instance and set within the workflow instance data objects (aka variables).

A bit of advance...

As you will see when running this sample, ID of the workflow instance is auto generated (in UUID format). But that can be changed and take advantage of either data or the MQTT topic itself. By setting correlation or correlation expression on the message (via its custom attributes) you can set the id to be more domain specific.


In this case, we take the room from the message and use it as correlation. Correlation upon start of the workflow instance becomes its id - aka business key and by that it can be used in exchange with the generated ID. With that said you can use this when interacting with service API.


You can look at the introduction video that covers the content of this article.

Let's get this running...

To get this running we need a MQTT broker. Personally I find Mosquitto to be excellent choice but any MQTT compliant broker would work.  

You can get Mosqiutto running with just a simple command (docker required)

docker run -it -p 1883:1883 -p 9001:9001 eclipse-mosquitto

There are other ways to run mosquitto so visit website if docker is not an option.

Run the Automatiko service

Since Automatiko generates fully functional service there is no much to do to see it in action. It is based on maven and leverages Quarkus as runtime so most Quarkus features are also available out of the box e.g. dev mode, Dev UI etc.

mvn clean quarkus:dev

and then wait a bit for maven to download all the bits....

Once it's started you should see similar log entries


You can head directly to http://localhost:8080/swagger-ui and you will be presented with nicely document API of your service


So it is now fully functional service connected to your local MQTT broker. With this you can start publishing sensor data to it and see how quickly they are consumed by Automatiko service.

You can use mosquitto client command to publish messages from command line

mosquitto_pub -t temperature -m '{"room":"livingroom", "value" : 25.0}'

use Swagger UI to see created instances based on incoming messages from MQTT.

Running as container

In case you would like to get this running as container then it is again dead simple, just run maven command with `container` profile enabled

mvn clean package -Pcontainer

And that's it. As soon as build is over you will have the container image in your local registry.

Conclusion

That's it for the first introduction - I hope it will get you interested and you will look forward for the next articles. They will come ever other week... at least that's the plan. Please share your feedback either here or via mailing list and twitter. 

If you have any ideas for the use cases to cover with Automatiko don't hesitate to let us know about them as we are here to help and explore.

Thanks for reading!